I almost have a motorcycle again – vs. a pile of unsightly parts! 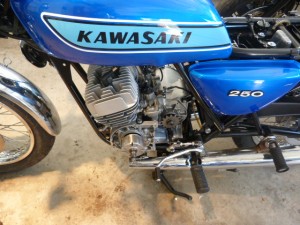
My rebuilt crank (fresh seals, new rod bearings – the works) arrived about two weeks ago all the way from Merry Olde England and since then I have devoted all available free time to getting the S1’s mighty-mite 250 cc triple cylinder engine back together.
Both case halves were glass-beaded during the downtime and then thoroughly washed clean of all abrasive media. (Don’t forget to do the bolt holes!) I decided to leave the cases bare aluminum rather than apply any coating. Though this bike will be ridden, it will lead an easy (and mostly indoors) life. It will not be rained upon if I can help it – and any spillage of oil will be promptly wiped away. This, I hope, will keep the bare metal looking nice for many years to come.
I also had new oil seals on hand for the clutch release rod, kicker and transmission shaft end. My bike’s original transmission was in excellent condition, with no significant wear apparent, so all I needed to do was clean the assembly up and prepare it for the resurrection. Same with the kicker assembly and other internals.
I reinstalled the shift drum in the upper case, then laid the new crank, the transmission and and kicker mechanism in their respective alcoves – checking for proper alignment and engagement of everything – and being absolutely sure – before proceeding to the next step, which was to spread a thin film of Kawa-Bond cement along the sealing surfaces of the lower case and then carefully lower it into place. You want to get this right because if you don’t and have to split the cases for some reason – because of something you forgot to do – you’ll face the tedious task of cleaning off all that Kawa-Bond before you can close up the halves again.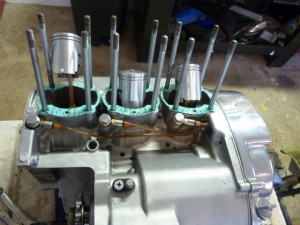
I torqued down all the case bolts per the manual and then let the assembly sit for a day before doing anything else. The engine won’t be running for a while yet, but I still wanted to give the seal all the time it needed to set before proceeding. With triples, sealing is very important. If you have bad sealing, you’ll have more than just a leak. The engine won’t run right, no matter what you do – short of taking it apart and fixing whatever you didn’t do right.
Next up, pistons and rings. I coated the needle bearings that each wrist pin rides in with assembly lube and eased the rings in place – being careful to line them up with the little pins Kawasaki thoughtfully provides in each ring land to orient them correctly. Be sure the arrows on the piston tops face the exhaust side!
Then I dabbed my finger in a cup of fresh Royal Purple oil and coated the internal surfaces of each cylinder bore before carefully lowering the jugs into place, one at a time. Since the S1 engine only uses two rings per piston, it is possible to use your thumb and forefinger (instead of a ring compressor) to press them into their lands as you ease the cylinder jugs down over them. The main thing is being careful – and taking your time.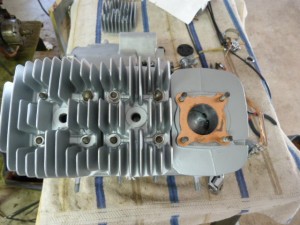
I tossed a new copper gasket onto the top end of each jug and then dropped the heads on and bolted them down. Just to be sure, I manually rotated the assembly using the kicker.
Looks good!
Now, the oil pump. Three lines run from it to a fitting at the base of each cylinder. The book says, incidentally, that when it’s time to start the engine for the first time, it’s imperative to manually hold the pump level to the WOT position to quickly purge any air from the system and to get fresh two-stroke into the engine, pronto. Normally, the pump action is controlled by a cable that operates in conjunction with the throttle cables that run from each carburetor to the right-hand grip.
After the pump, time to install the carbs. Some prefer to wait until the bike is in the frame to attach the carbs – and even the cylinder jugs and heads. In fact, the shop manual advises this. But I’m strong enough to comfortably pick up an assembled two-stroke triple engine and get it into the frame – and much prefer the easier access to hard to reach bolts you enjoy with the engine still on the workbench. I also find it’s easier to do the preliminary manual synching of the carb throttle slides, because you can easily see them going up and down with the engine still out of the frame vs. in the frame.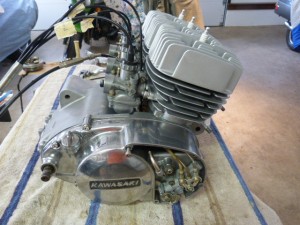
Now, at last, the Moment had arrived. Time to return the S1’s engine to its rightful home. So I first laid some soft towels on (and around) the frame tubes – to avoid nicking them during the install – and called upon my wife for her expert assistance. While I manhandled the engine into approximate position, she told me “higher” or “lower” or “a little bit forward” until I got the first of the mounting holes lined up with the right spot on the frame. Then she slid in the bolts for me.
The S-series bikes have a rear upper mount with two swinging tabs hanging off either end of the mounting boss (with a bolt running through that). The other end of the tabs mount to a boss on the frame. Getting this one done first will make the others easier because it helps to locate the engine in the frame cradle. Next do the front uppers – once these are in the, the lowers ought to be all lined up and you should be able to just thread the long bolts that go through them directly into position.
Button it down, stand back – and behold the awakening! 
I still have to deal with one remaining – and probably expensive – stumbling block before I can fire the engine. I discovered a couple of days ago that my original exhaust pipes are not usable in their current state. I had hoped to use them to run the bike in, then either replace or refurbish them as money became available. But after 20-plus years of sitting, the pipes are clogged up with something inside – and I can’t get the baffles out to find out what that something might be. Three days of soaking in penetrant have only resulted in oily, rust-laded glop running out of the back end. I suspect the baffles are rotted away – rendering the pipes redneck objets d’ art only.
Unfortunately for me, nice condition S1 factory pipes are almost impossible to find and NOS pipes impossibly expensive ($2k is the usual asking price if you can find a set). My best option seems to be a set of aftermarket Denco-style chambered pipes – which I also found in the UK (see Higgspeed.com). They’re not cheap, either – about $800, including the cost of shipping. But they are gorgeous – and superior to the stock pipes in every way except originality and I can live with that.
So, it’ll be a few weeks before I can amass the necessary coinage – and the another couple before the pipes are here and on the bike. I am hoping to have all my ducks lined up for an engine start around the end of April.
Stay tuned!





The S1 is BEAUTIFUL. Compared to it, my 1980 GS 850 is a fat, black slug. But in its defense, it treated me well for many years for little money, in great comfort. Now that my kids are out of diapers, I have resumed my every-nut-and-bolt restoration. My son convinced me to get it going, I had already had the transmission done by R&D, and most of the major chassis components powdercoated, engine cases powdercoated or polished, head done and cylinders bored 1mm over, and seat re-covered in modern fabric by Sargent. I still need crank oil seals, and various other unobtanium parts (including an exhaust). And my extra treat is that I have to set the depth and engagement of the drive and driven gears in the secondary for the shaft drive. Thank you for your inspiration, and keep it coming!
Ah, but a good, everyday rideable and reliable bike like the GS850 has its virtues, too! I have a similar bike – ’83 GL650 Interstate. For less than $2,000 I have a go-anywhere, anytime touring bike that always gets at least 50 MPG, no matter how I ride it. It’s one of my favorites!
PS: I have had a minor setback with the S1. The spring that controls the kicker has broken. I am going to have to pull the engine to get at it and make the necessary repairs. Argh!
My sympathies!
Took a few pictures of the cat’s ass yesterday.
That’s gorgeous… makes me (almost!) want to go out and get one, too… but the repercussions would be severe!
How’s it run, son?
Dood, I took it out for the first 50 mile break in. It runs super strong. The positive feel of the belt drive is amazing. I didn’t take it over 2,500 rpms. It was hard to keep them down. Also, I kept going up and down in rpms to help the break in. I’ll have more to report later this week. The bike is powerful though man! Shoot!
That exposed drive belt thing looks tough, I’ve gotsta say! The whole bike looks tough!
I bet it has muscle car-like part throttle roll-on courtesy of that big ol’ lump of V-twin….
This is a sweet video:
Yamazuki (actually a Honda CBR) vs Hildo’s chopper
Notice the patch on the left shoulder of Hildo’s jacket?
I guess I’m going to need to get one too! Hildo’s bike does not sound stock. Look in the video at his shift lever moving all over the place, then his kick lever dancing around too. Too damn funny. What a great video!
That is ( cue George Thorougood) bbbbbbbad!
Dammit…. I need to order mah pipes!
Dood, that jankz is bad to the bone! It’s going to perform too mang. I am so pumped dude. 120hp and 125ft/lbs torque. Wait till you see the pipe I’m bolting on! Just got a phatty oil cooler in the mail too, 10 rows.
Darn top motor mount bracket needs to be hogged out a bit. The cylinders on this unit are half an inch shorter than stock. Running the oil lines is proving to be a bitch too. Such a simple thing turned into a PITA. Might not have it done this weekend. S’all good. Going to take my time and do it right. This nice weather has me all antsy though. Shit, I’m going to take a few days off work. Have like 60 hours saved up.
Stuff like that always happens! I know you’ll be patient and do it right – it’ll be worth it!
I am waiting to find out how much I “owe” for taxes – which will determine whether I can order my $900 pipes now… or later.
Hogged out the motor bracket. Fits just right now. Went to the Harley dealership and actually found a useful part, two oil fittings. The setup I made looks fucking perfect. Better than I planned even. Got the pipe installed tonight, but still have a shitload more to do. Maybe two more days of work and I’ll have my unit blowing some smoke! This shit is gonna romp!
Nothing better than some motor therapy! We need pictures! (And I need to learn how to post pictures in these posts!)
What was the hp rating of the stock engine? Around 90 or so hp? You have 120 now, right?
Gonna be a huge difference, mang – better get ya a mount for the V1!
Update:
Got the jankz running!
Holy hell does it tach up fast.
I freaking sandwiched my NEW charging system hot wire between the exhaust bracket and frame! Had to tinker with the new ignition system for a bit too, shit was not tossing a spark and I’m still not sure why. It is now though. I rigged up a plastic bottle from the rafters to feed fuel to the unit, so I don’t have to install the tank until all systems have been tested thoroughly. Cylinder one was getting super hot. Break in sheet states do five 3 minutes runs going up and down in rpm between 1k-2k. This gives the head gasket and gaps a chance to marry well. Then drive it for 50 miles and change the oil (which hopefully I can do tomorrow, or early this week). This freaking engine is loud and revs fast as shit. I am kinda scared of it! LOL
Should be around 116 horse power 125ft/lbs torque.
Was around 60hp before.
P.S. There is no Mafucken way your jankz will eat my lunch.
We should do an epautos sponsored race!
Wish BrentP was closer, we could set his lunch at the finish line too.
I’ve gotta do the same deal! Rigging up a gas IV is a good move; taking the tank on and off while doing these prelims is a needless PITAS.
Double the hp – yeah, be careful first time you ride that thing!
And yup, your jankz will eat my lunch!
My po’ little S1 is just an ankle biter….
Eventually, though, I’ll get an H2 to play with…
That’s S&S Cycle. An old line manufacturer of high performance equipment for Harley. They are located in central Wisconsin (USA).
I lieky, Sho Nuff B Kwak a Lakkin!
OT: Toilet Security Administration
http://www.youtube.com/watch?v=HdnmGHOkokk
Hurry up and get the pipes! I got the old evo engine out this evening with ‘the other Ken’s’ help and slapping in the S&S 111″ monster tomorrow with some D&D fat cat pipes. This unit is going to perform. 900lb 120hp Harley vs. the Kaw! Pretty sure I’ll get that ass!
$900 chief!
I need to catch my breaf….