


It’s the parts unseen – and unthought about – that end up living a hard life. And potentially, making life hard on you.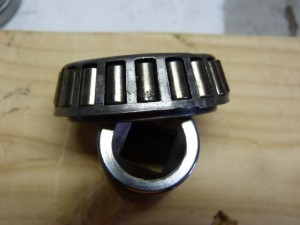
Wheel bearings, for instance.
Properly greased and adjusted, they quietly do their job – which is to keep hubs and the wheels bolted to them turning (and rolling) smoothly on their spindles; axles rotating freely, not wobbling, not binding (and possibly, seizing). But people sometimes forget to grease and adjust them – and that can lead to trouble you don’t want, including the possibility of a hub (and the wheel and tire bolted to it) actually snapping off the spindle/steering knuckle due to heat build-up and friction-induced failure … leaving you three-legged at 70 MPH in a curve.
Which is absolutely no fun at all.
Well, how often should bearings be checked? The basic test – checking for excessive drag and “play” – should be done every time the car is up in the air for a tire rotation or brake work. Ideally, once a year. The test is simple. With the wheel/tire off the ground (car on a lift or supported by jack stands) try to spin it by hand. It ought to rotate freely and easily, with just a little bit of drag. If it feels sticky or you can hear grinding noise (really bad) it is very likely that the bearings are in need of grease (minimally) and maybe damaged and in need of replacement.
If it passes the free-roll test, check for excess play (in and out and side to side movement) by grabbing the tire at the 9 and 3 position. Try to pull it toward you and back; a very slight amount of play (check your service manual for the exact specifications for your particular vehicle) is ok. Same for side play. Pull the tire at the 3 – and then the 9 – to check for that.
If it feels a little too loose/wobbly – or you can’t roll it freely by hand/hear grinding noises – you’re going to need to dig into it. The general procedure is straightforward (and for purposes of this story, we’ll be assuming a rear-drive car and working on the front wheel bearings; FWD/AWD cars are bit more complicated but the general process is similar) and well within the abilities of the do-it-yourselfer. You will need the following:
* Floor jack and jacks stands to raise/support the vehicle.
* Lug nut wrench.
* Flat blade screwdriver; socket set.
* A hammer.
* Hi-temperature wheel bearing grease (comes in a tub).
* Parts cleaner/solvent and a small plastic tub/old toothbrush.
* Spare cotter pins.
* Shop manual for your particular vehicle.
The first thing to do is loosen the lug nuts on the wheel you’ll be working on first. Do this before you raise the wheel or it will spin when you try to turn it and you will have a heck of a time getting the nuts loose! Don’t remove them. Just loosen them with the wrench enough that they turn easily.
Now raise/support the car and remove the wheel/tire.
You should be looking at your disc brake rotor/caliper at this point. In the center of the rotor will – ought to be – a dust cap. Underneath this is the outer wheel bearing. It can be greased/checked/replaced without further disassembly. But if the outer bearing is worn (or clearly been running – turning – without adequate grease, probably the inner bearing should be checked, too. Let’s start with the basic adjustment.
Use the screwdriver and hammer to – gently – pry out the dust cap. Set it aside.
There should be a cotter pin and a castle nut facing you. The nut should be slightly less than hand tight. If it’s tighter, it’s probably too tight. To adjust: Remove the cotter pin and loosen the castle nut. Turn it in by hand until snug, then back it out just enough (1/4 turn or so) to line up the holes so you can re-install the cotter pin.
Assuming the bearing (and/or the race it rides in) is not scored – and greased sufficiently – the wheel should now turn freely and there should be no excess play, either in and out or side to side. If so, you’re done. Reinstall the dust cap, using the hammer to tap it back into place, mount the wheel, tighten the lug nuts as tight as they’ll go by hand to seat the wheel. Then lower the wheel/remove the jackstands and tighten the lug nuts (be careful not to overtighten them). It’s best to tighten in a criss-cross pattern, gradually increasing the torque (tightness as you go. Ideally, have a torque wrench on hand and tighten to the specifications listed in the manual. But if unavailable, just a bit more than “hand tight” is usually about right.
Repeat this process with the opposite wheel.
If the wheel does not turn freely, if you can hear friction as you rotate the wheel/hub by hand… the bearings (and races) must be physically checked, cleaned and re-greased. If you find any evidence of wear – such as scoring/discoloration (see first pic in this article; note the scratches on the rollers) indicative of excessive heat build-up, or they do not turn freely in your hand after cleaning them thoroughly, they will need to be replaced – along with the races they ride in.
First step is a physical examination, which requires removing them from the hub, which usually requires removing the dic brake rotor – which usually requires unbolting and setting aside the brake caliper. These are typically held in place by two large bolts. Some, as in the case of my old Trans-Am, having Allen (recessed hex) heads – in which case you’ll need to get the appropriate size Allen wrench/socket to loosen/remove them. Support the loose caliper on something or use wire so that it does not just hang by the brake line. 
Next, remove the cotter pin and the castle nut. Grab the rotor and pull it toward you. It ought to slide off the spindle/steering knuckle. The outer bearing will pop out (try to catch it so it doesn’t just fall on the dirty garage floor) but the inner bearing will be held in place by the rear grease seal, which is a press fit deal.
Plop the out bearing in the bucket of solvent, then use a screwdriver to remove the inner bearing grease seal. It’s a throw away and can’t be re-used, so buy a new replacement (two of them, if you’ll be working on the left front and the right front hubs). You may also want to preemptively buy new inner/outer bearings (which will include their matching races). Maybe just buy one of each, since you may only need to replace one of each (and be able to re-use one each of your old ones). They’re not expensive, at any rate (mine cost about $10 each). So buying a matched set (four total; two inner, two outer – plus a pair of grease seals) is probably the best bet.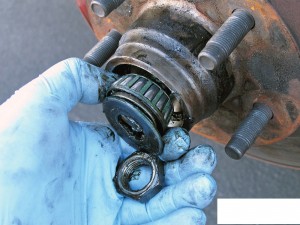
With the grease seal out, the inner bearing comes out easily. Soak it in the tub of solvent. Use brake cleaner spray and old rags to clean the area around the races (they’re press-fit inside the rotor) and examine them for scratches or other obvious indicators of wear. Use the toothbrush/solvent to clean the bearings; you want all the old grease out and all the metal visible for inspection.
If the bearings turn out to be bad, you’ll want to replace the races along with them as these are matches parts and if one’s worn/damaged, the other probably is, too.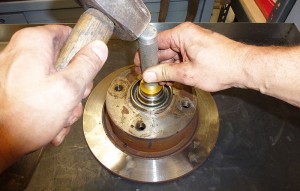
If the bearings are bad, the next step is removal of the old races. The easiest way to do this is to dig in your toolbox and find a socket with an outside diameter about the same as that of the bearing you want to get out. Use it – and the hammer – to knock out the old race by placing the socket on the race’s shoulder and tapping on it with the hammer. The outer race comes out toward you, if you’re facing the hub/rotor with the wheel studs pointing at you. Turn the rotor upside down to knock the inner race out. Thoroughly clean/wash down the area afterward with spray brake cleaner. To install the new races, use the socket and hammer to tap them into place, being careful to apply force evenly until they’re completely seated.
With that done, you’re ready to grease the bearings and begin the re-assembly process. Grab a glob of grease with one hand and use the other to work it into the bearings – in between the rollers, especially – until the entire assembly is thoroughly coated. Place the inner bearing in its race and tap the new grease seal into place. Now, you can reinstall the rotor/hub back onto the spindle/steering knuckle. Push it on all the way, then re-install the (also greased) outer bearing and the washer (typically) that goes on top of it. Thread the castle nut by hand until it seats. Rotate the hub to be sure it’s seated and re-check your work. Now, back the castle nut out just enough (about 1/4 turn, as we talked about above) to allow you to slide the cotter pin in the hole. Install the cotter pin, rotate the hub while listening for any sounds that aren’t right – which means any sounds of friction, such as scraping – and excess tightness; the hub/rotor ought to turn easily by hand.
Reinstall the brake caliper. Mount the wheel/tire on the hub.
You’re done!
If you value independent media, please support independent media. We depend on you to keep the wheels turning! Things are tight this month especially (please see here).
Our donate button is here.
If you prefer to avoid PayPal, our mailing address is:
EPautos
721 Hummingbird Lane SE
Copper Hill, VA 24079
PS: EPautos stickers are free to those who sign up for a $5 or more monthly recurring donation to support EPautos, or for a one-time donation of $10 or more. (Please be sure to tell us you want a sticker – and also, provide an address, so we know where to mail the thing!)


I appreciate the tip about doing the wheel test. I may have to try this occasionally on my own. However, I think the best protection against wheel bearing problems is to listen to your car. Before you have any major problem your car will normally give you a sign. When I had bad bearings my wheel started making a scrapping sound when I turned. I noticed it and took my car in as soon as I noticed it fixing the problem before it became a big problem.
Hi Jesse,
Happy to!
I admit to being more than a little OCD about car maintenance. Still, I’ve only had to replace a few bearings over the years in my personal vehicles – which I attribute to keeping them greased and adjusted per spec!
FWIW you can thank big bro for the sealed ball bearing thing. They are a fraction more efficient, just a bit less rolling resistance, so an easy way to gain on the CAFE.
Had to do the cartridges on the wife’s Grand Caravan last fall- I figured a couple hours for wheel bearing inspect/pack or replace. Turns out they are cartridges with the whole hub assy to bolt on the rear tube axle. $100 per side and a major PITA to change.
And the neighbors look down on me for not driving a new car… I win.
Thanks for this series of articles Eric! Keep em coming!
Thanks, Ryan – I’ll try to!
eric, it’s been my experience that when the race is perfectly clean and you can see a pattern, no matter how dim, of the roller bearings on the race, it might still have a decent amount of time left but only because of new bearings. It’s not often I replace a bearing and not the race also.
Anyone wanting to see the difference in new and old races, just put the new bearing in the new race and then in the old one. You’ll see a difference in how far into the race the bearing runs between the two. That’s your sign. And if for some reason getting the race off is a really big deal, Install the new bearing and drive it straight to a shop where you can remove the race if it’s married to the shaft for some reason…..and then install that new race. Just think of it as being “brand new” at this point, look at your odometer and know you have close to that amount of mileage for these bearings. I always note mileage and parts replaced in my vehicle book. It takes a lot of guess work out. When was that those bearings were replaced? Doesn’t seem all that long ago…..and after a while you try to line up when they were replaced and figure out it’s been 15 years. You don’t have to do that if you write it down in the owners manual or your service book….or both.
eric, 20 or more years ago I bought a little plastic bearing greaser that works so nicely it’s hard to believe there wasn’t always something like it(probably was). It has a small shaft in the center and a tapering “race” for a few inches that will grease a large difference in bearing size. You have a top that goes over the bearing and you just push it down and it forces grease from the inside and both ends into the bearing. It’s as full as it can possibly be at this point. I spin the bearing to take some of the extra off the outside and it’s ready to be installed. I love this little do-hickey. Previous to it, I had spent my entire life putting gobs of grease into one palm and working it into the bearing.
And now Eric, we await your clutch replacement post……and that rear-end rebuild.
This is essential if you have a 4×4…I re-did my axle’s bearings. The seals dry rotted and water got in. Looked just like the photo above, but those gouges were on the rollers, not the races. The races were just pitted from mud or something that got in there-probably when I got it stuck in a mud hole for a day before getting towed out in remote wilderness. In that case, my yoke and u joint also broke because a friend floored it when stuck (with a flat tire on top) while I was working the hand winch. Drove home 500 miles @45mph on the front axle alone, and those had bad u joints themselves. When I removed them, the front u joints were rusty inside, and were missing the needle bearings. That is another thing too- grease those if they have the fitting. Most now are sealed.
anchar, I’ve always been anal about greasing everything. It it doesn’t have a zerk, install one. Now on GM products I’ve been amazed at the mileage their u-joints would give, the factory sealed jobs, but once that’s over I replace them with a good joint with a zerk hole and get the beefiest zerk I can find. You can find some that the ball and spring part are the smallest part of them instead of that being right behind that part of the zerk. One thing I always have on hand is various SAE and Metric zerks of all types. I keep a grease needle handy to make sure I can get on all of these.
A couple pickups I’ve had with 4WD had zerks in nearly impossible places with access only through a hole in the transmission crossbar. For these and a couple others I changed my gun to a 6′ hose and would get the wife to operate the gun standing to the side while I used all 3 hands to get a needle on the zerk and hold the driveshaft at the only angle you could get on the zerk. I’ve had front end parts with zerks that were nearly impossible to get on but not bad at all if you change to a different angle zerk. Adapt and overcome.
Not really. The sealed ball bearings will generally last a very long time if the wheel doesn’t hit a curb or such. Being ball bearings they can’t take much load in the axial direction. Tapered roller bearings are designed to take much more axial loading and tougher. Problem is they need separate seals and even then they aren’t perfect hence the need for cleaning and repacking.
But even in old solid rear axle cars the bearings at the end of the axle tubes are generally sealed ball bearings and have the same weakness.
I always go 12 and 6 for checking front wheel bearings, 3 and 9 will pick up on sloppy suspension components…
Also nice to have a ‘race driver’ in the toolbox, esp if you are doing larger bearings (i.e. truck/trailer) http://www.northerntool.com/shop/tools/product_200353977_200353977?utm_source=CSE&utm_medium=Google&utm_campaign=Automotive%20%3E%20Auto%20Body%20Repair&utm_content=9094250&ci_src=17588969&ci_sku=9094250&gclid=COzSk8n1mcUCFQuraQodSVwAuQ
FWIW I don’t mind the sealed bearings, they’re usually (not always) less work/mess to change out. Don’t think I’ve ever paid more than $75 for one.
Problem is most everything made in the last 20 years or more passenger car wise has sealed ball bearings for wheel bearings. The tapered rollers aren’t so common any more. Not much to do with them until it’s time to replace them. They usually are buried in hub assemblies and just to get at them and remove a seal (carefully) to regrease one you might as well just have replaced it or in some cases (mostly for the rear wheels on FWD cars) just replace the entire hub assembly.
Welcome to the 21st century. Planned obsolescence to the max. The $10 bearings and races are hermetically sealed within a $200 hub assembly, designed to be tossed out rather than repaired. Manufacturers save a bundle having hub units made overseas.
God forbid that. Replacing hubs is a Ben Franklin each. I so long for the days when you could get a set of bearings and races for 20 bucks cash. Also hitting a curb with those bearings did not necessarily mean replacement but today’s crap with aluminum does. I hate modern vehicles. they are just all crap period.
David Ward
Guitarman6052
Memphis, Tennessee
BTW the front hubs on my Dodge Ram 1500 quad cab are not dealer or user serviceable. that means bad bearings, new hub. At least a C note on ebay.
For crying out loud they are bolt on appliances onto the crappy aluminum steering knuckles Dodge puts on their trucks. So any curb, pothole or minor brush means the part is damaged and needs to be replaced at the tune of 250 plus. I’m in the wrong business. I should make crap and charge people a bazillion bucks to replace it.
And now you know why the company I work for only has OLD GM pickups, cause they can get 2 Dodge or Ford pickups for the price of one GM, hence I get to put up with the most ill-handling, electronics fucked up new trucks there are…..Dodge’s. Great Engines, terrible everything else. Just wait till the inevitable disconnect on that wifi gas pedal. Nothing like getting caught in the middle of a two lane and have it go to idle…..or be out in the middle of no cell phone territory when it does that……and stop, or have all those warning lights on the dash go on and the cruise quits when that happens. BTDT……bunches of times. The other brother buys GM’s and keeps them a long time with few problems. They cost a lot more though.
The bearings are hardened steel. The issue is that ball bearings are used because ball bearings can be sealed for a very long life. The problem with ball bearings is they can’t take much load in the axial direction. This means hitting a curb damages them. Tapered rollers can handle a lot of axial load. Tapered roller bearings are also more expensive and require separate seals that aren’t anywhere near as good as what can be done with ball bearings so they aren’t sealed for life. If you’re looking to cost reduce the car and make it last through the warranty for the majority who won’t clean and repack wheel bearings well the answer is clear. It’s all about priorities in design.
Ball bearings, according to my Nissan pickup meant using them for end bearings on transmission shafts, hence loading them in a way to maximize their directional forces of their design. Unfortunately for lots of pickups is getting some slack in the whole of the driveline, an expected thing, but made so it’s not a game killer. And those compromises are what make or break what is nearly the same part, sometimes the “almost” exact same part. It’s even a deal breaker in an alternator, normally built with rollers(of some sort) or bushings(my choice). Just my view out of the parts washer.
Hi David,
One thing I did not mention in the article but probably should have: It seems most over-the-counter wheel bearings are sourced from (surprise) China. They’re cheap as hell – the guy quoted me $8 for the outers/races. But I am really skeeved out by Chinese-made anything, especially mechanical things. So I ordered NOS GM (made in the USA, a long, long time ago) bearings/races instead. These were about $25 each.