


It’s been raining for five days straight out here in The Woods. Not good for the writing mojo – or for riding. But, a great time to do some cleaning.
Air-cooled bikes like my ’76 KZ900 have lots of nooks and crannies – the finned cylinder head/upper engine block especially. Plus, the bike is almost 40 years old – and like people who are getting up there, it tends to leak some.
Well, seep is more like it.
Gaskets get brittle, gaskets shrink. Even if you replace them all (which I did, on this bike, about five years ago when I rebuilt the engine) they still seep a little and the more you ride, the more obvious the seepage becomes. Left uncleaned, it accumulates, cooks off – and after a certain point, it’s practically impossible to get rid of it all without putting the parts in the parts washer… which entails taking the bike apart.
I prefer to keep ahead of it and do thorough cleanings once every 2-3 years. By “thorough” I mean more than a casual hose-off and wipe-down.
I mean thorough.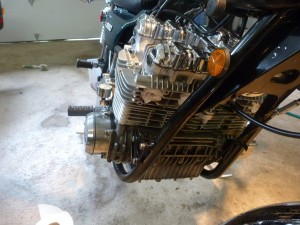
Which entails removing some parts. Not a major disassembly. Just so you can get at the engine. So, off comes the tank and side covers, the pods (cone air filters, used in place of the stock air box) and then – the big one – the exhaust headers and can (what bikers call the muffler).
On an air-cooled bike, this is easy enough. Remove the eight 10 mm nuts and lock washers (on an in-line four cylinder bike) that hold the header to the cylinder head, plus whatever’s holding the can to the frame. Save the hardware (plastic baggies are good for this) and stuff clean rags or crumpled up paper towels in the now-open exhaust ports, to keep crap – and water – from getting in there while you clean. With the header off, you’ll be able to get at the engine’s cooling fins much more easily – and at the header tubes, too. They probably need de-bugging and polishing (if chrome, as mine are). It is much more pleasant to clean/polish headers with the headers off the bike.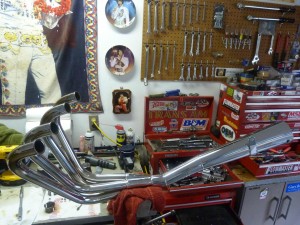
I like to use Honda Brite “total cycle cleaner/degreaser.” Not a product pitch – just a recommendation. The stuff is not caustic and will not damage chrome or plated/polished/powder-coated surfaces. It won’t harm rubber or plastic, either. With the bike cold, soak it down with the cleaner/degreaser. Let it sit for a couple of minutes, per the instructions on the bottle. With a masonry finishing sponge – pick these up at Lowes or Home Depot, etc., they are extra thick and extra soft and just the ticket for cleaning a bike – and a bucket of sudsy water (use a good quality car wash) – thoroughly scrub down the bike, then hose it off. Keep everything wet while you work. Don’t let the cleaner – or the sudsy water – dry on the bike. And wash it down thoroughly once you’re done with the sponging.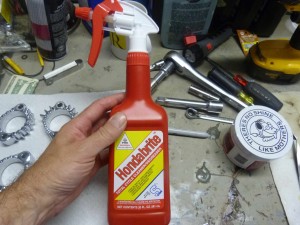
Don’t do this in bright sun, by the way. Direct sunlight will evaporate the water – and dry out the cleaner/degreaser. An overcast day – or dusk/early morning – is the ticket.
Once washed down, roll the bike inside the garage (if you have a garage) to dry it off. Use soft towels for this. I use big bath towels to get the big water, then small hand towels to get into the nooks and crannies and mop up the small pools.
From here on, it’s just a piece-by-piece process of cleaning (and if need be, polishing) each case, cover, nut and bolt – the shininess standard being entirely subjective and to be determined according to your own degree of anal retentiveness.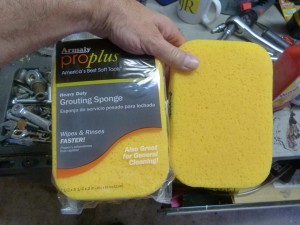
Before you reinstall the pipes, you will hopefully have gone to the bike store (or gone online) and ordered/got a new set of copper crush gaskets. The old ones are crushed – and if you reuse them, there’s a good chance the pipes won’t seal right and you’ll have an annoying/obnoxious exhaust leak – ftt! ftt! ffft! fftt! – which is easily avoided by using new gaskets every time you remove/re-install the exhaust.
This is also a good time to get out your torque wrench and check the tightness of the cylinder head bolts. Check/tighten each one – being sure to use the correct measure and also the correct tightening order (this is very important; don’t be a Clover and just tighten them in whatever order you think seems right). Often, some of the bolts will be slightly loose, especially if the engine was rebuilt fairly recently – as mine was. I found four bolts that needed slight tightening.
Also check the cam cover bolts – and the cam cover gasket (and those “half moons” especially). The bolts are often loose – or were over-tightened – and the gasket may have deteriorated beyond the point of no return. If it looks questionable (if you had a lot of seepage) replace the bugger – and spare yourself further seepage.
At least, for awhile.
Keeping a bike spotless is almost impossible – unless it’s parked in your living room as a static display. And even then, it’ll still get dirty.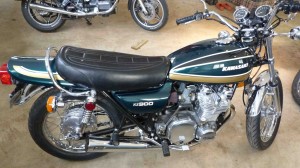
Our work is cut out for us!
Throw it in the Woods?
Twitter: LibertarianCarG
We depend on you to keep the wheels turning. If you value alternatives to the MSM, please support independent media. Our donate button is here.
For those not Pay Pal-inclined, you can mail us at the following:
EPautos
721 Hummingbird Lane SE
Copper Hill, VA 24079


Dear Eric,
News Flash! Re: bikes and bikers.
Season 7 (2014)
Sons of Anarchy has been renewed for a seventh and final season that will premiere on September 9, 2014, with an hour-and-30-minute episode.[18][83]
The final season will have a total of 8 episodes.
http://en.wikipedia.org/wiki/List_of_Sons_of_Anarchy_episodes#Season_7_.282014.29
I normally always try to use OEM gasket sets & o-rings (especially on carburetors) but there are many bikes & quads (cars too) that have known issues with sealing the factory gaskets such as the cylinder base gaskets on Evo Hogs. Then it is better to use aftermarket gaskets. I recently overhauled a big bore Kawi quad that require RTV sealant in lieu of gaskets on much of the top end. Excessive silicone oozing out from under joints is one of my pet peeves and it is entirely possible for it to plug small oil passages inside the engine, if it breaks loose. Plus it’s just effin ugly.
That being said my cleaning routine for my CB650 consists of hosing it off, spraying it down with WD40 & wiping it off with an oily rag. Owning a rat bike is sheer pure joy! Neglect and abuse only enhance the looks. Of course the mechanical bits are all in perfect working order.
Hi Moto,
I pretty much go by the book as far as gaskets and sealants (Kawa/Honda “bond” for the cases) though I prefer to use copper for the cylinder head. I’ve found that the cam cover can be kept nearly leak/seep-free if you start with a fresh gasket (and plugs) and are careful to torque it spec rather than just tighten it down, as many do. I aslo replace it about every four years or so, because of shrinkage – which leads to leakage.
PS: I had the carbs completely apart last week (triggered y a stuck float in one) and was shocked – shocked! – at the amount of goo (and rust) that had accumulated inside since the last time I had them apart (about seven years ago). Two of the four pilots were completely occluded. Yet the bike still ran well.
I think it’s gonna run a lot better now!
Unfortunately for your carburetors, ethanol has made carb dis-assembly & cleaning into a routine maintenance item that probably needs to be done every 2 or 3 years. Yamaha used to sell a fantastic pour in carburetor cleaner that could often (but not always) get the jets clean without taking them apart, but I haven’t seen a bottle of it in years.
Agreed, MS –
It’s just another modern PITAS, brought to us by rent-seeking corporations and government.
Good advice, Eric.
Eightsouthman is right about the form-a gasket. I was in the industrial maintenance business for years and sold literally tons of RTV and similar compounds. There are quite a few factories out there being held together by the stuff!
One suggestion for drying a bike after a casual wash: You are right about the nooks and crannies holding water on air cooled machines. I saw ads in magazines for hand held air blowers and decided to try using compressed air for drying. I use a Guardair air gun that has venturis and blows like crazy. It helps to have a serious air compressor as well. This drying technique cuts the time of washing and drying my Super Glide by more than half, and does a better drying job as well. I’ve been doing this for years without any problems.
eric, I’ve always been one to use the best gasket set I could get. I had a problem on the intake manifold on an engine and couldn’t seem to make the multi-piece gasket seal perfectly. So I bought some high temp RV form a gasket gasket maker. It was guaranteed to never leak and it didn’t, ever. I began using it on everything in place of a gasket and never had anything leak. It sounds too good to be true and you have to get everything perfectly clean and let it tack before putting the two sides together but it sure does work well. Against my better judgement, I used it for an exhaust manifold gasket…..and never had it fail. Hell, I even used it on the kitchen sink. While I don’t think I’ll ever be able to part the two pieces, I don’t believe I’ll ever need to. I quit using plumber’s putty altogether. I’ve noticed some equipment I have used or bought had some excess sticking out from mating surfaces and have never had them leak.
Hi Eight,
I’ve done this also!
But, how about in lieu of the copper gasket in between a cylinder head and the cylinder jugs on an air-cooled bike? That sucker’s gotta take a lot of pressure (and heat)! I think I’d be skeered to try that…
eric, I can’t say since I haven’t done it. I am a SS gasket kind of guy for heads anyway. I realize many gasket makers have some outstanding gaskets of various types for heads and the thing that keeps me using them on liquid-cooled engines is the fact that many engines don’t have head studs although you can always retrofit them so that when your head goes on, it’s perfectly positioned. I almost used it once on that type of engine but backed out since the type of gasket I used I had never had fail, ever, and it’s much faster but…..if I didn’t have the proper gasket and needed that engine to be up and running the next day(I would never tell you to wait less than 24 hrs of set-up time for form-a-gasket in dire cases such as this, but I would do it and not worry about it needlessly. I don’t want to squeeze any into a cylinder or plug a coolant hole but careful application can really go a long way with the stuff. I don’t just dole it out in situations like that anyway. I apply it and then try to smooth it to the same thickness on each part if it’s small enough for my finger or requires a putty knife or straight-edge to do so. I’m a firm believer, enough so that I WOULD use it on a head, air or water either, if it was a have-to thing and wouldn’t lose any sleep over it. The old original Form-a-Gasket brand with the high temp high copper stuff is fairly bullet-proof. You have to keep in mind the best gaskets as far as heads and things with pressure are concerned now are generally fairly thick so any irregularities are covered by default compression but the form a gasket simply goes everywhere it’s not forced out and stays there. Having said that though, I’m big on getting both surfaces decked and using SS gaskets…..and have never seen one fail. I’m also big on using a very low temp liquid such as the very thin solvents that don’t leave a discernible film. I’m speaking of highly flammable stuff so be careful with it. I like to use my Binks spray gun so that no cloth or paper towel ever touches the surface prior to application of gasket maker. Some will use paint thinner but I consider that wayyyy too oily to use.
I agree with Randy for drying chrome and everything else with dry, compressed air.
eric, one more thing. If you’re using faucet water, add some vinegar and it will leave it streak-free. I won’t use my well water on much of anything except me and CholleyJack(he loves it) so I often end up at the car wash and have a couple jugs of vinegar water on hand to wash it down after it’s rinsed. Some spot free rinses actually work well too….at the carwash I mean. I really need to get a good RO system and quit having this hassle. That reminds me, I gotta go bleach the well. later